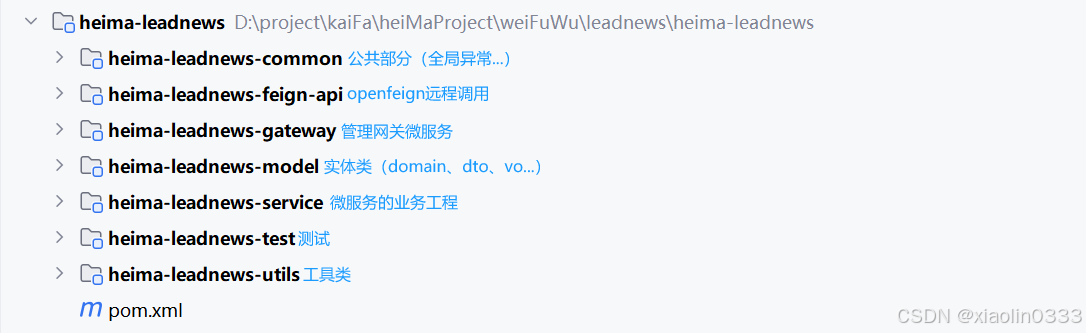
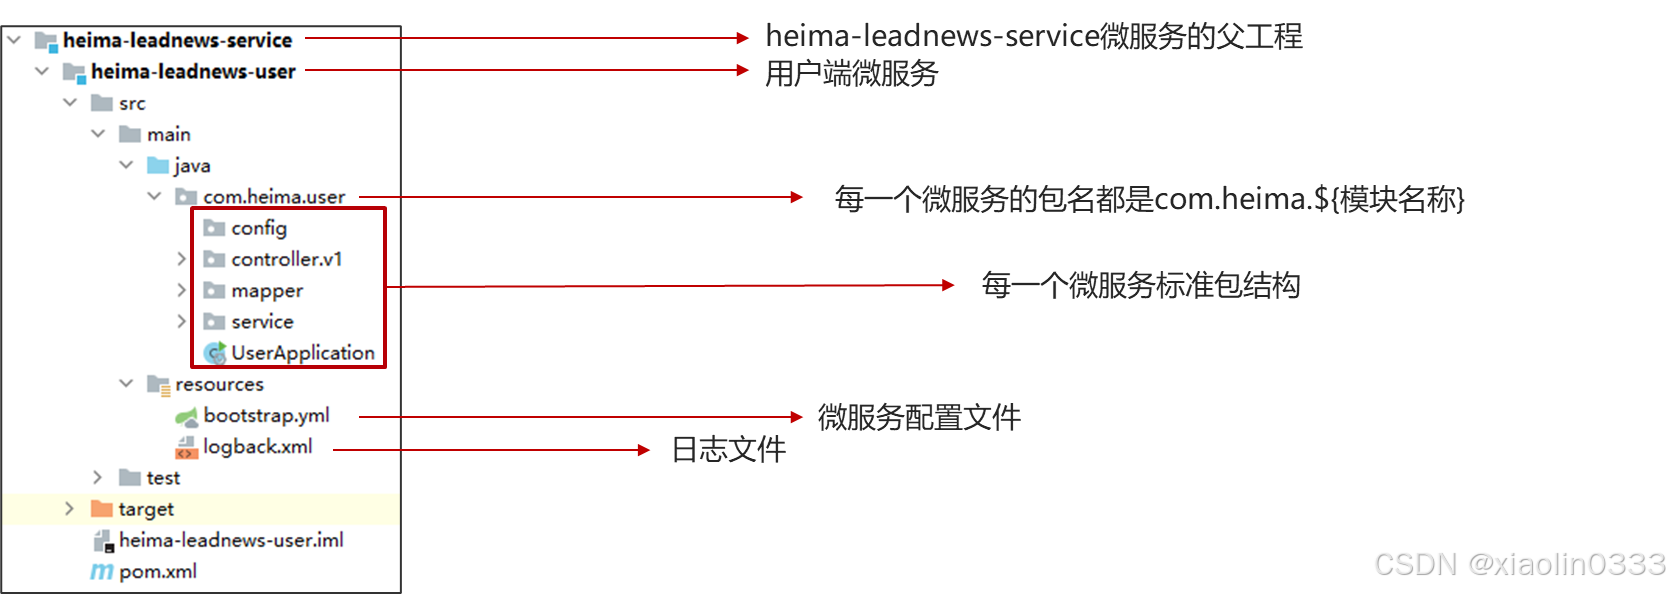
目录结构
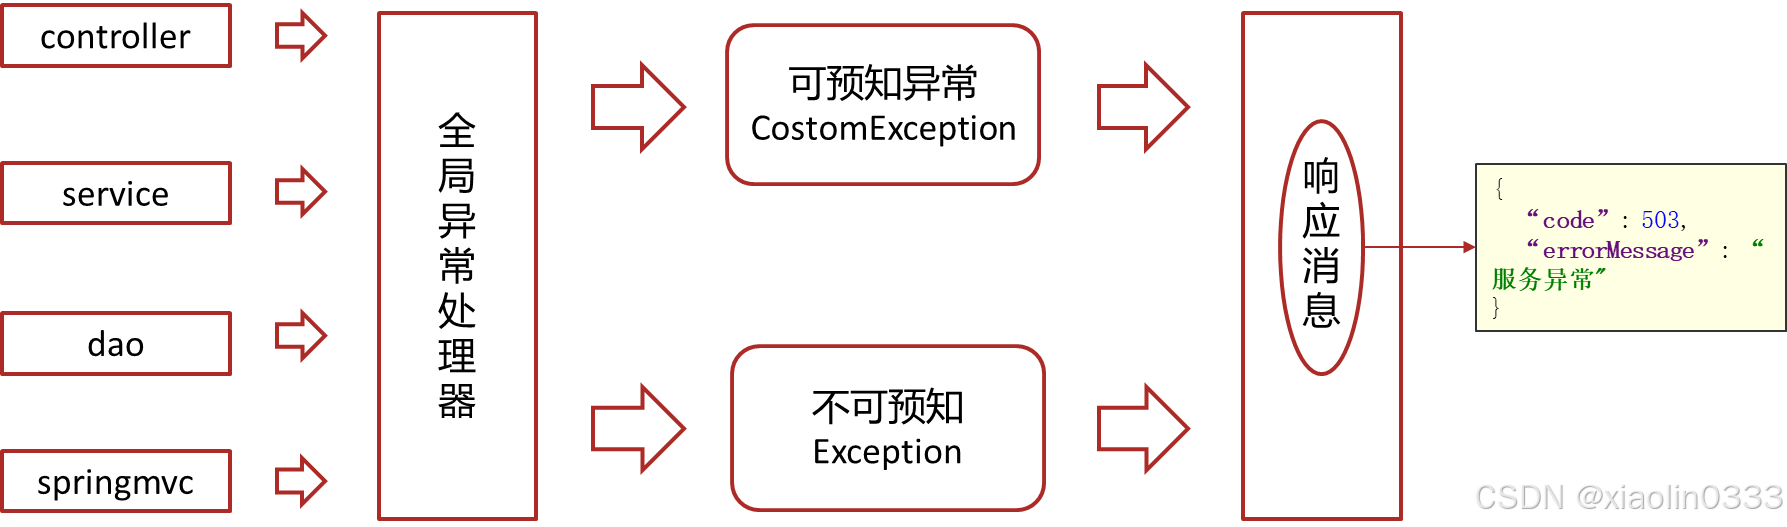
全局异常
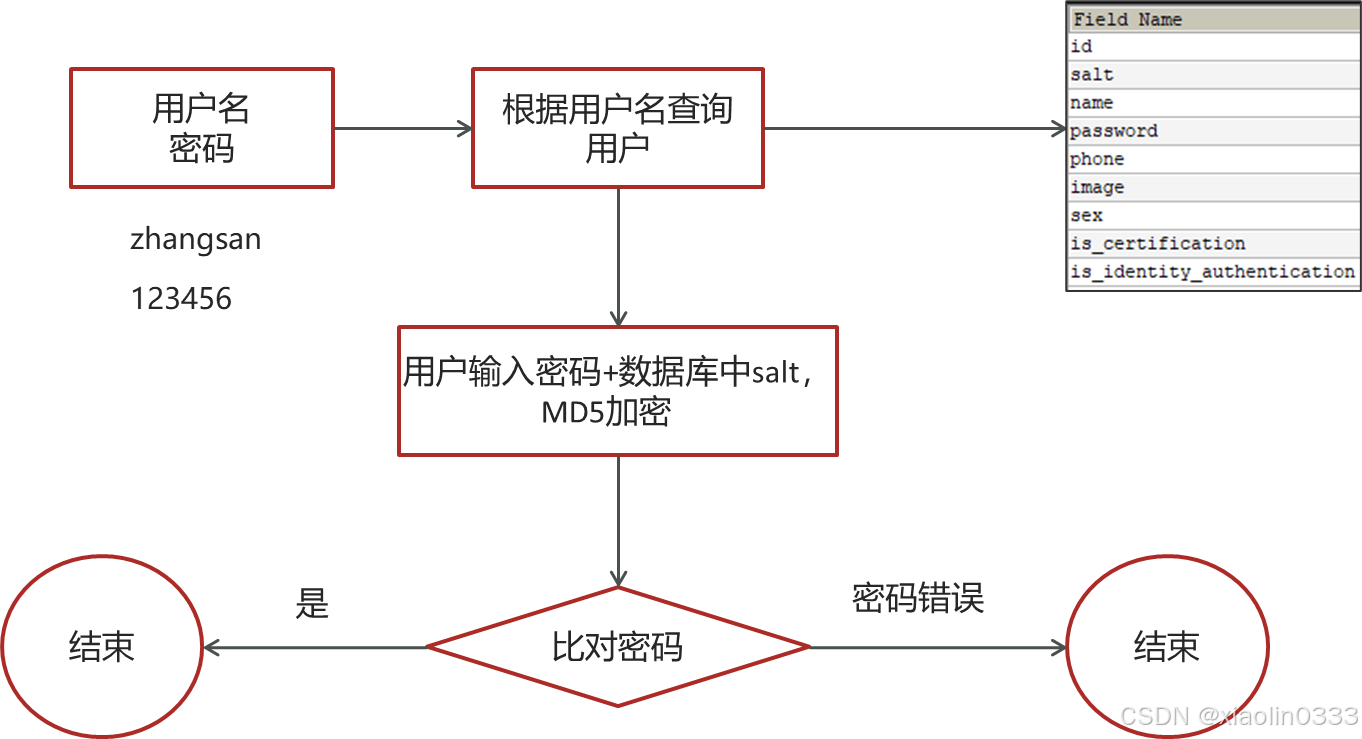
登录手动加密(md5 + 随机字符串)
【问题】md5是不可逆加密,md5相同的密码每次加密都一样,不安全。
【解决】在md5的基础上手动加盐(salt)处理
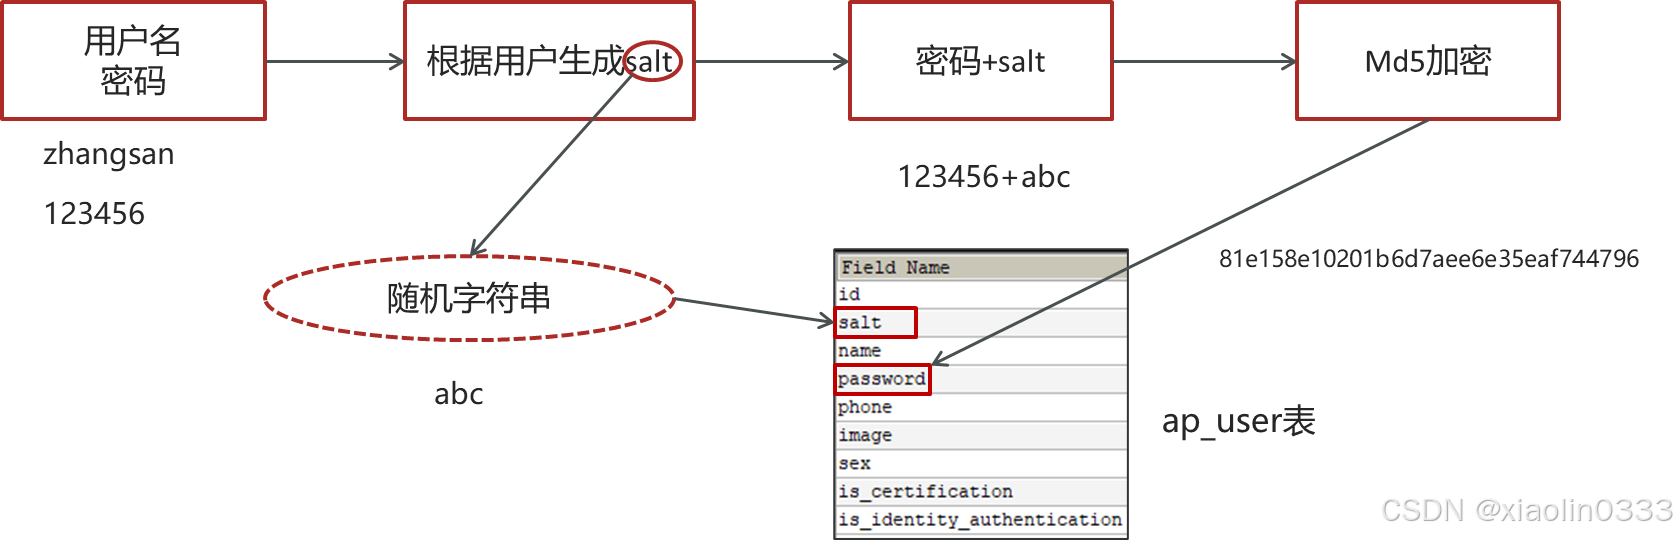
校验过程:
接口测试
1. ApiFox中测试
2. swagger
- 引入依赖
<dependency>
    <groupId>io.springfox</groupId>
    <artifactId>springfox-swagger2</artifactId>
</dependency>
<dependency>
    <groupId>io.springfox</groupId>
    <artifactId>springfox-swagger-ui</artifactId>
</dependency>
|
- 在common模块下添加swagger配置类:
@Configuration
@EnableSwagger2
public class SwaggerConfiguration {
@Bean
public Docket buildDocket() {
return new Docket(DocumentationType.SWAGGER_2)
.apiInfo(buildApiInfo())
.select()
.apis(RequestHandlerSelectors.basePackage("com.heima"))
.paths(PathSelectors.any())
.build();
}
private ApiInfo buildApiInfo() {
Contact contact = new Contact("黑马程序员","","");
return new ApiInfoBuilder()
.title("黑马头条-平台管理API文档")
.description("黑马头条后台api")
.contact(contact)
.version("1.0.0").build();
}
}
|

- swagger的常用注解
- @Api:修饰整个类,描述Controller的作用
- @ApiOperation:描述接口
- @ApiModelProperty:描述属性
成功后启动项目,浏览器访问:http://localhost:51801/swagger-ui.html
3. knife4j(常用)
knife4j继承了swagger,功能比swagger更强大,也会生成接口文档
- 引入依赖
<dependency>
     <groupId>com.github.xiaoymin</groupId>
     <artifactId>knife4j-spring-boot-starter</artifactId>
</dependency>
|
- 在common中添加配置类:
@Configuration
@EnableSwagger2
@EnableKnife4j
@Import(BeanValidatorPluginsConfiguration.class)
public class Swagger2Configuration {
@Bean(value = "defaultApi2")
public Docket defaultApi2() {
Docket docket=new Docket(DocumentationType.SWAGGER_2)
.apiInfo(apiInfo())
.groupName("1.0")
.select()
.apis(RequestHandlerSelectors.basePackage("com.heima"))
.paths(PathSelectors.any())
.build();
return docket;
}
private ApiInfo apiInfo() {
return new ApiInfoBuilder()
.title("黑马头条API文档")
.description("黑马头条API文档")
.version("1.0")
.build();
}
}
|
同样也需要在resources目录中添加该配置类的全类名
成功后启动项目,浏览器访问:http://host:port/doc.html
网关
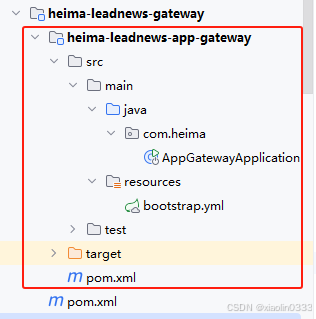
1. 配置网关
一个父模块(heima-leadnews-gateway)下,放多个子模块(heima-leadnews-app-gateway)。
- 在父模块中引入依赖
<dependencies>
    <dependency>
        <groupId>org.springframework.cloud</groupId>
        <artifactId>spring-cloud-starter-gateway</artifactId>
    </dependency>
    <dependency>
        <groupId>com.alibaba.cloud</groupId>
        <artifactId>spring-cloud-starter-alibaba-nacos-discovery</artifactId>
    </dependency>
     <dependency>
            <groupId>com.alibaba.cloud</groupId>
            <artifactId>spring-cloud-starter-alibaba-nacos-config</artifactId>
        </dependency>
    <dependency>
        <groupId>io.jsonwebtoken</groupId>
        <artifactId>jjwt</artifactId>
    </dependency>
</dependencies>
|
- 编写子模块的引导类
package com.heima.app.gateway;
import org.springframework.boot.SpringApplication;
import org.springframework.boot.autoconfigure.SpringBootApplication;
import org.springframework.cloud.client.discovery.EnableDiscoveryClient;
@SpringBootApplication
@EnableDiscoveryClient
public class AppGatewayApplication {
public static void main(String[] args) {
SpringApplication.run(AppGatewayApplication.class,args);
}
}
|
- 编写子模块的bootstrap.yml
server:
  port: 51601
spring:
  application:
    name: heima-leadnews-gateway
  cloud:
    nacos:
      discovery:
        server-addr: 192.168.140.102:8848
      config:
        server-addr: 192.168.140.102:8848
        file-extension: yml
|
- 在注册中心中引入子模块的配置
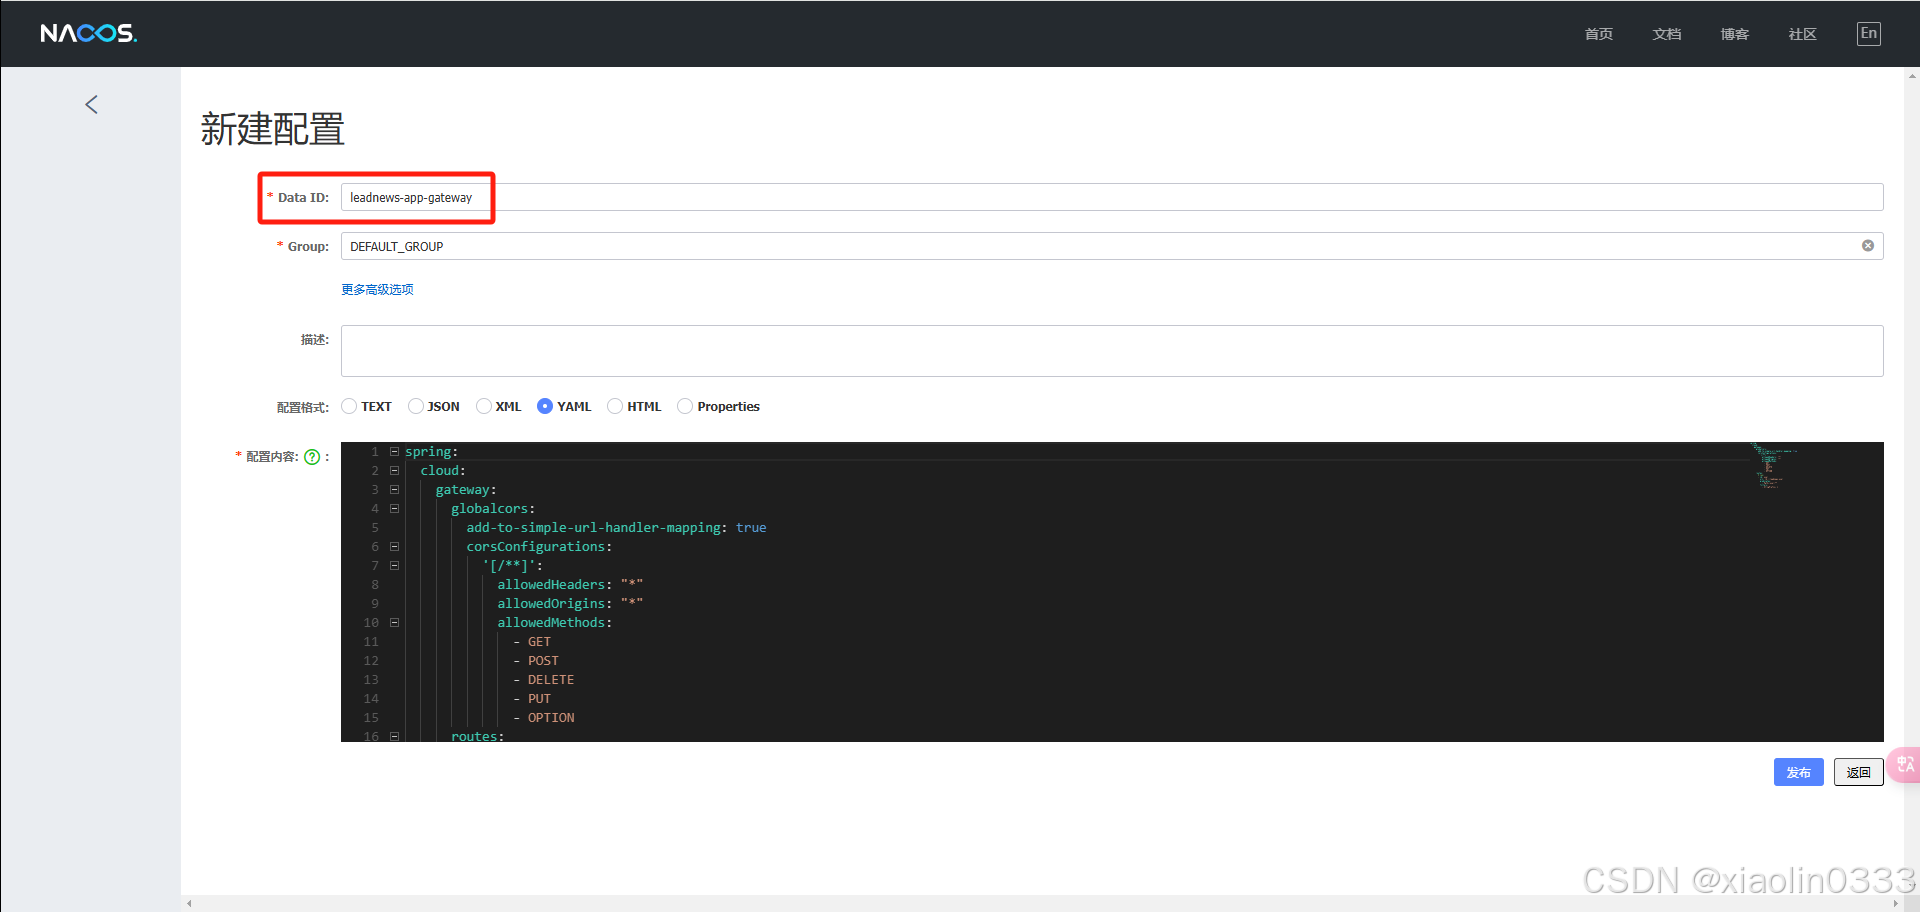
spring:
cloud:
gateway:
globalcors:
add-to-simple-url-handler-mapping: true
corsConfigurations:
'[/**]':
allowedHeaders: "*"
allowedOrigins: "*"
allowedMethods:
- GET
- POST
- DELETE
- PUT
- OPTION
routes:
- id: user
uri: lb://leadnews-user
predicates:
- Path=/user/**
filters:
- StripPrefix= 1
|
2. 设置认证过滤器
@Component
public class AuthorizeFilter implements GlobalFilter, Ordered {
@Override
public Mono<Void> filter(ServerWebExchange exchange, GatewayFilterChain chain) {
ServerHttpResponse response = exchange.getResponse();
ServerHttpRequest request = exchange.getRequest();
if(request.getURI().getPath().contains("/login")) {
return chain.filter(exchange);
}
String token = request.getHeaders().getFirst("token");
if(StringUtils.isBlank(token)) {
response.setStatusCode(HttpStatus.UNAUTHORIZED);
return response.setComplete();
}
try {
if(!AppJwtUtil.isValidToken(token)) {
response.setStatusCode(HttpStatus.UNAUTHORIZED);
return response.setComplete();
}
return chain.filter(exchange);
}catch (Exception e) {
response.setStatusCode(HttpStatus.UNAUTHORIZED);
return response.setComplete();
}
}
@Override
public int getOrder() {
return 0;
}
}
|
认证过滤器用来拦截前端发过来的请求,写在网关里。
文章列表
表的拆分——垂直分表
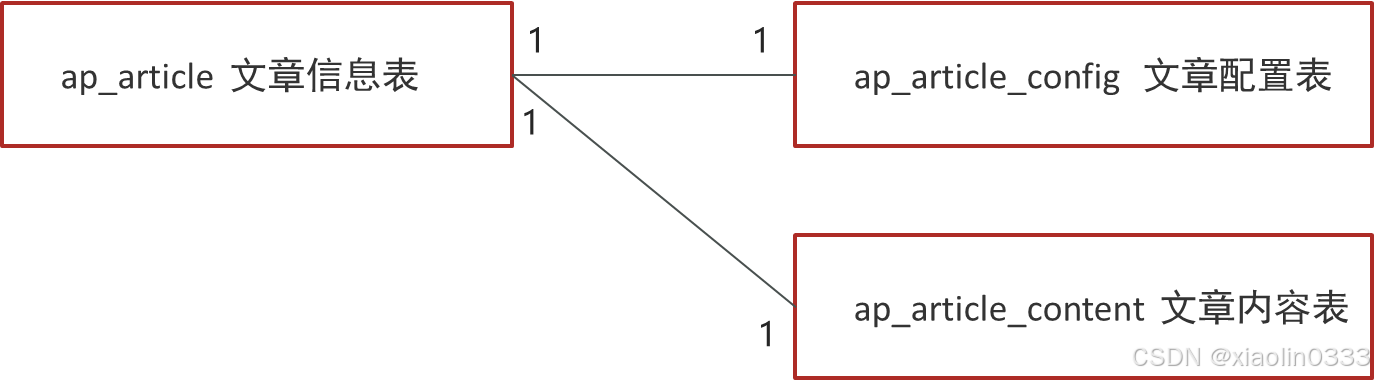
将一个表的字段分散到多个表,每个表存储其中一部分字段
优势
- 减少IO争抢,减少锁表的几率(查看文章信息与文章内容互不影响)
- 充分发挥高频数据的操作效率,对文章信息操作的高频率不会被操作文章详情数据的低效率拖累。
拆分规则
- 把不常用的字段单独放在一张表
- 把text、blob等大字段拆分出来单独放在一张表
- 经常组合查询的字段单独放在一张表
文章详情
方案1. 直接查文章内容表
用户某一条文章,根据id去查询文章内容表,返回渲染页面

方案2. 静态模板展示(效率高)
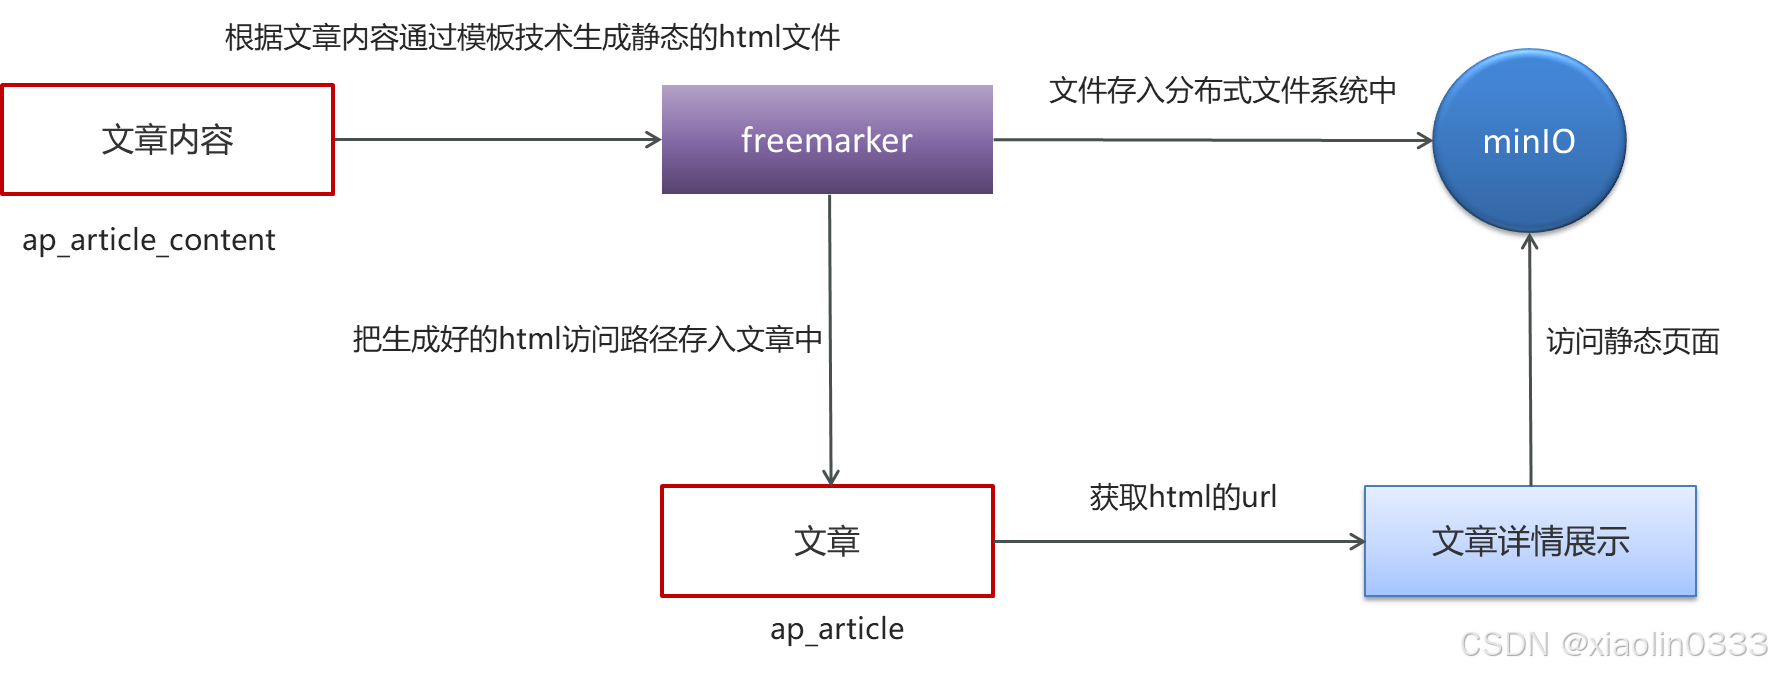
把文章的内容变成静态的html文件,把生成之后的文件上传到minio中,并保存生成的html存入文章信息表中(static_url字段),前端渲染的时候,直接获取文章信息表的static_url字段,然后去minIO里获取静态访问页面即可。
Freemaker知识点:Freemarker模板引擎技术
新增文章的测试类:
@Test
public void createStaticUrlTest() throws IOException, TemplateException {
ApArticleContent apArticleContent = apArticleContentMapper.selectOne(Wrappers.<ApArticleContent>lambdaQuery().eq(ApArticleContent::getArticleId, "1302862387124125698L"));
if(apArticleContent != null || StringUtils.isBlank(apArticleContent.getContent())){
Template template = configuration.getTemplate("article.ftl");
Map<String, Object> content = new HashMap<>();
content.put("content", JSONArray.parseArray(apArticleContent.getContent()));
StringWriter out = new StringWriter();
template.process(content, out);
InputStream in = new ByteArrayInputStream(out.toString().getBytes());
String path = fileStorageService.uploadHtmlFile("", apArticleContent.getArticleId() + ".html", in);
apArticleService.update(Wrappers.<ApArticle>lambdaUpdate()
.eq(ApArticle::getId, apArticleContent.getArticleId())
.set(ApArticle::getStaticUrl, path));
}
}
|